Tuesday, February 26, 2013

Mardi Gras Ideas!

I realize Mardi Gras is over but I wanted to try some ideas out.  So I "frankened" my own green from a slew of nail polishes:  
Orly "Rocker Chick"
Sally Hansen "In The Spotlight"
Cirque "Helleboro"
Revlon "Bonsai"
Wet n Wild "Sage In The City"
Quo by Orly "Turquoise Moonlight"
Sally Hansen "Scarab"
Sally Hansen "Plume"

And I came up with my frankened:  "Jealousy"!


I tried a different idea on each finger nail, and here's what I managed for my Mardi Gras nail art!


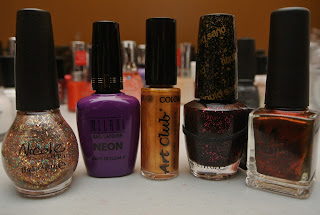
I used a variety of polishes to obtain my mardi gras rendition which included some of the polishes I used for my frankened "Jealousy" along with Wet n Wild "Buffy The Violet Slayer", Milani "Gold Glitz", Revlon "Hypnotize" and Nicole by OPI "A Gold Winter's Night".

Wednesday, February 20, 2013

You've Got Mail!

When I get mail, it's usually a parcel from Nail Polish Canada!  And with this website it's FREE shipping in Canada!  Usually you see websites with free shipping within the USA, but here I finally get a repreave from the shipping costs.  Thanks Nail Polish Canada! Check out their website for some great choices of nail polish:  http://www.nailpolishcanada.com/

So now on with my parcel!  I received some great polishes and want to show you a few of them.  The first one is by piCture pOlish from Australia called "voodoo".  The first picture of my nails shows one coat.  It looks like a very deep raspberry colour.  The next picture of my nails is two coats and this is more like the bottle colour, a deep crimson brown with gold shimmers throughout.  You could easily wear it with dark browns, deep crimsons and even some purples.  


Then I applied models own "Copper Pot" for a large french tip.  This polish has a reddish copper shimmer to it so it works well with the raspberry hues of "voodoo".  I think this looks very rich.  (I didn't get models own "Copper Pot" from Nail Polish Canada though, just in case you were going to look for it there.)  And then to top it off I applied Color Club Art Club "Gold Glitter" to the line of the french tip.


Sunday, February 17, 2013

Snakey Ruffian

Hi again!  This design is called Ruffian, which gives an accent shade to a French manicure in reverse.  I tried essence "High Spirits" as the base coat for the accent shade and Revlon's "Enthrall" for the top layer.  Enthrall is a wonderful greeny gold shimmer.

 Then to spice it up, I stamped Beauty Gal's "Gold Special Nail Paint" with BundleMonster L.


Saturday, February 16, 2013

A Coat of Many Jesters!

When I had finished this nail art design, it looks like a jester's jacket! 
Anyway, here's my Coat of Many Jesters! manicure!  
 I split up the nail design in half:  
one half had Misa "Bourbon On The Rocks" for the first coat 
and  OPI "Stay The Night" liquid sand for the second coat.
 Then the other half of the nail design was:
Milani "Rad Purple" for the first coat
and Nicole by OPI "A Gold Winter's Night"
 Each of the second coats have their own texture:  one side the sparkle of gold and turquoise
while the other side has the liquid sand texturing.
 The down the centre was a line of Color Club Art Club "Bronze"
Yes, a Jester's Coat indeed!


Pink Sunrise!

I was looking out the window this morning and saw a beautiful pink sparkly sunrise.  The sun was shining through the clouds and it looked like dimmed sparkles.  My camera didn't do it justice so I'm not showing the photo here, but this manicure looks similar to what I saw - God's handiwork so early in the morning!
So I called this nail art design Pink Sunrise!

To begin I'll show you the polishes I used:


Sally Hansen "In The Spotlight"
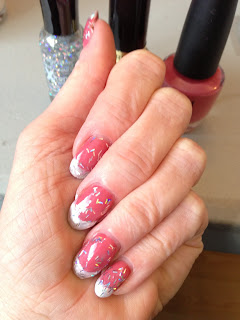
Revlon "Pure Pearl"
China Glaze "Sugar High"

 My base coat is china glaze "Sugar High" with the french tip of Revlon "Pure Pearl".  The whole thing is covered with the long straw shaped sparkles from "In The SpotLight".

This would make a great party manicure!

Peacock Flames

I was looking for Mardi Gras colours for next month and decided to put some of these colours together randomly with a v-shaped manicure and I got something that looked like Peacock Flames (in my mind).  Here's the list of polishes I used:  
Misa "Bourbon On The Rocks"
Essie "Trophy Wife"
Sally Hansen "Purple Potion"
Nubar "Chocolate Caramel"
China Glaze "Midnight Mission"
For the V-shape, I also used:
 Sally Hansen "Silver Sweep"
Colour Club Art Club "Silver Glitter"

I really liked this one.  The colours all look rich and have a shimmer to them.


Pink Demure

We were in Maui last month and I picked up an Island Girl nail polish that I thought could work for a more demure looking french manicure.  So this is what I did.  Sally Hansen's Magnetic "Graphite Gravity" has a very nice sheen without the magnet texturing.  So that is the base coat.  Then I used Island Girl Hawaii's "Polynesian Heat" for the french tip because it also has a pearly sheen.

 I added Colour Club's Art Club "Silver Glitter" for the fine line of glitter.

Drizzled Chocolate Covered Strawberries!

Hi again.  I couldn't sleep last night so I stayed up late and tried another nail art design, "Drizzled Chocolate Covered Strawberries"!  This was easier than I thought when I first saw someone else's rendition.  I used a base coat of Rimmel's "Stiletto Red".  Then I added Revlon's "Hot for Chocolate" to make it look like a strawberry had been dipped in chocolate.
 Now I tried a form of the spun sugar technique.  I dropped Sinful Colors "Snow Me White" onto a clear hard plastic backing from a carton just so it would be sturdy.  I find that Sinful Colours is more tacky than other whites and easy to use for this technique.
Then you wait a little while for the white to get tackier and pull it across the chocolate part of the nail with a dotting tool, (you could also use a toothpick) randomly to look like it's been drizzled.  And voila!  Just add some strawberry seeds spots on the red and its done!

Faded Hearts!

Next, to continue on the valentine's theme, I tried something I'd seen on Pinterest but I used my colours.    I did every other nail the base coat of Zoya's "Penelope" and the rest of the nails' base coat of Sally Hansen's "Gray-t Escape". 

Then I made a heart shape at the top of each nail in the opposite colour.

I tried one last thing by adding dots outlining the tops of the hearts.  Not sure if I like this or the plan hearts better.


French Polka Dots!

Ok, I had fun with this nail art.  I used Covergirl's "Black Diamond" as my base coat for the french tip.  Then added dots of China Glaze "Flyin' High", "Sugar High", and Sally Hansen's "Ivy League".


New York Bling

I've done many nail art designs during this past week.  The first one I'll call, "New York Bling".  I used Illamasqua "Glitterati" for the first coat and then added some more sparkle with NYC "Big City Dazzle".
And here's the result: